Last week, guest blogger Amy Stout shared some fall file folders she created for her daughter Kylie, who experiences autism. As promised, Amy is back this week with a Thanksgiving turkey craft idea that doubles as a therapy tool…thought Kylie doesn’t know that!
Button Thanksgiving Turkey Craft
If you have followed my blog for any length of time, you know that I am the queen of altering and adapting things. I can’t leave well enough alone and always have to put the “Amy spin” on it. I am often inspired by things I have seen online or in my daily life, but they often don’t quite work for my family or I get creatively inspired to enhance what I have seen to suit my taste/needs. My Button Turkey is another one of those projects.
I first saw a Button Turkey here, here and here. As you can tell (if you click on those links), there are only about 5 feathers for the child to work with. This would be great for beginners, but I felt my daughter needed more of a challenge.
So, I began to brainstorm how I could alter the design to better suit my daughter’s needs. Most of you already know that Kylie has poor strength in her hands, wrists and upper body in general, so I am constantly in search of activities that will work her fingers and help to increase that strength and coordination while also being fun, tactile, and visually appealing.
Once I came up with my idea, I began to search for a pattern for the Button Thanksgiving turkey craft but never was able to find one, so I decided to create my own. Yes, I am going to share it with you. You can print it by clicking on the below image:

After clicking the image, click on the printer icon at the top right of your screen. Select the size you wish to print (I suggest a full page). You may also want to laminate the pieces for durability. I found this to be very helpful.
Another reason I loved this idea/craft is that it is soooo inexpensive to make. You probably have half the things you need right at home.
Supplies you will need:
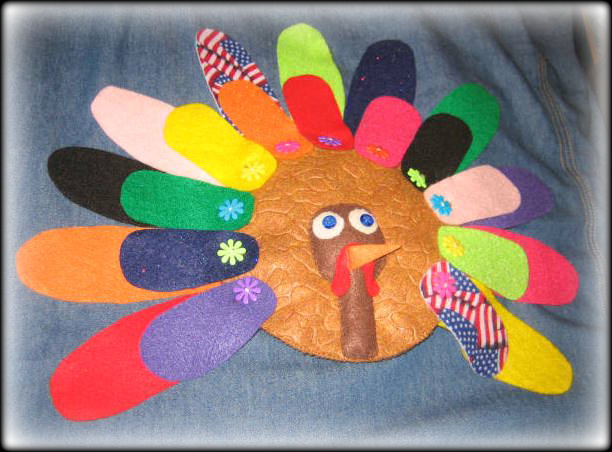
- Felt. You can see the pics in this post to see the colors I chose.
- A good pair of scissors that cut felt easily.
- A disappearing ink felt tip pen for tracing (I found it at Walmart in the sewing section)
- A needle and various color threads to match your felt turkey body colors. I used mainly brown, red, orange and cream from a travel sewing kit I had stashed in a closet.
- 24 buttons (I found mine at Michael’s). 22 for the feathers (you can do 11 front and 11 back) plus 2 smaller buttons for the Turkey’s eyes.
- astuffing (optional) (Kylie had a stuffed animal with a hole in it, so I “borrowed” some stuffing from our formerly stuffed friend.)
The one thing that I think is REALLY neat is the stamped/pressed felt that I used for the body. It is called “cobblestone” and I found it at Michael’s Craft Store. I thought it really added some good texture and dimension to the project. I also found some sparkly and patterned sheets of felt at Hobby Lobby. All these little touches help keep it fresh and exciting when your child is buttoning 22 feathers.
Directions:
- Print, laminate and cut out your pattern.
- Trace 11 large feathers and cut them out before the ink disappears.
- Trace 11 small feathers and cut them out before the ink disappears.
- Trace 2 circles and cut them out before the ink disappear.s
- Trace 2 eyes, 1 waddle, 1 nose/beak and 1 head/neck and cut out before the ink disappears. You may want to keep these pieces in a plastic baggy to keep them from getting lost.
- Label the circle that will be the front of the turkey.
- Position the small feathers around the front circle of your turkey.
- Sew on the buttons to the front circle so the buttons correspond to your feathers.
- Cut slits in the feathers to be used as button holes.
- Repeat steps 6-9 for the back circle and the large feathers.
- Set all of those pieces aside for now.
- Sew the 2 buttons onto the eyes. I used blue small buttons on cream circles.
- Attach the eyes (felt and buttons) to the head/neck. You can either sew by hand or use fabric glue.
- Sew or glue the waddle on to the head/neck.
- Sew or glue the nose/beak to the head/neck.
- Sew or glue the head/neck to the front circle.
- Optional step: place a little stuffing in the head/neck toward the end of your sewing to give it some “plump.”
- Glue or sew (I prefer sewing by hand) the front circle of the body to the back circle of the body making sure all of the buttons are on the outside of the circles.
- Optional step: place a little stuffing between the circles before your sewing is complete to give it a little “plump.”
- Attach the small feathers to the front of the turkey.
- Attach the large feathers to the back of the turkey.
- Take a picture and send it to us. =0)
For more pictures of the different steps, visit Amy’s blog entry with the complete button turkey tutorial.
Let’s Talk More Thanksgiving Turkey Craft Ideas
Once again, more educational games for fall can be found at Amy’s blog, www.histreasuredprincess.blogspot.com. Have you developed holiday-themed activities for your kids with special needs. Would you like to share them for other parents to adapt? Just leave a comment!
Do you like what you see at DifferentDream.com? You can receive more great content by subscribing to the quarterly Different Dream newsletter and signing up for the daily RSS feed delivered to your email inbox. You can sign up for the first in the pop up box and the second at the bottom of this page.


Oh what a great idea! Thanks for sharing, I love doing crafts with my girls and this is great to practice those fine motor skills!
Oh what a great idea! Thanks for sharing, I love doing crafts with my girls and this is great to practice those fine motor skills!